Home Aero Testing: How to Optimize Your Bike Position Without a Wind Tunnel
By Sarah — translated from an article by Charly Caubaut Published on 30/06/2026 at 08h31 Reading time : 11 minutes
Aerodynamics, a Holy Grail Within Everyone's Reach
Hey there, fellow cyclist! Let me tell you a little story. When I started triathlon, I spent hours analyzing photos of the pros. Their bikes looked like they were sculpted by the wind, their positions were incredibly aggressive. I thought, like many, that this level of optimization was reserved for an elite, accessible only through outrageously expensive days in a wind tunnel. It was an inaccessible world for the enthusiast I was, juggling work, training, and family life. Then, over miles and miles and through discussions with other die-hard triple-sport athletes, I understood something fundamental: the quest for aero is, above all, a personal adventure, an exploration that can begin in your own garage and on your training roads. 🚴♂️💨
The idea of "free speed" has a certain magic to it, doesn't it? Pedaling at the same power, with the same feeling of effort, but going faster. It's not sorcery; it's physics. And the good news is you don't need an engineering degree or a pro's bank account to start playing with it. In this guide, I'm going to share everything I've learned in the field. We're going to break down how to set up your own aero testing protocol, with tools you probably already have. Forget the images of white lab coats and giant fans. Think instead of a training ride turned into a spy mission against your worst enemy: air resistance. Ready to become an aero detective? Let's get in the saddle!
Why Aero is the Most Cost-Effective Marginal Gain
Before we get our hands dirty, let's talk a bit about the "why." Why all this fuss about aerodynamics? After all, we're constantly hearing about power, watts, MAP... That's the engine, right? Yes, but imagine having the engine of a Ferrari in the body of a bus. You won't be going very fast. In cycling, it's exactly the same thing.
Air Resistance: Your Main Opponent
As soon as you exceed 15-20 km/h on flat ground, the main force you have to overcome is no longer tire friction or gravity; it's air resistance. This invisible force is constantly slowing you down. And the worst part is, it doesn't increase linearly. It increases with the square of your speed. In plain terms: if you double your speed, the air resistance is four times stronger! It's an exponential battle. To ride at 40 km/h instead of 30 km/h, the effort required just to cut through the air is much more than 33% greater. That's why at high speed, every additional kilometer-per-hour costs a colossal amount of energy. Understanding this means understanding that the slightest reduction in this resistance will have a huge impact on your speed or the energy you save.
Frontal Area (CdA): The Key Concept to Master
So, how do we measure this resistance? Engineers use a value called CdA. Don't worry, I promised not to get bogged down in jargon. Just imagine that the "A" (Area) represents the size of the obstacle you present to the wind. It's your silhouette as seen from the front. The taller and wider you are, the larger this area is. The "Cd" (Coefficient of drag) is the "shape" of that obstacle. A sphere is more aerodynamic than a cube of the same frontal area, so its Cd is lower. Your CdA, therefore, is the product of the two: your size facing the wind and your ability to be "slippery." The goal of any aero test is simple: to reduce this CdA value. Either by making yourself smaller (reducing A), or by adopting a more streamlined shape (reducing Cd), or both!
Body vs. Equipment: Where Are the Biggest Gains Hiding?
That's the million-dollar question. We see bikes for €15,000, wheels that look like spaceship discs... and we think that's where it all happens. Wrong! The studies are unanimous: about 75% to 80% of the total aerodynamic drag comes from the cyclist. You. Your body. Your helmet, your arms, your legs, your torso... that's the biggest brake. The bike and components account for the remaining 20-25%. What does this mean? You can have the most expensive bike in the world, but if your position is like a parachute, you'll be slow. Conversely, with an optimized position on a mid-range bike, you can literally drop much better-equipped competitors. This is the best news of the day: the biggest speed gains are free. They depend only on you, your position, and your willingness to experiment. That's what we're going to focus on.
Your Personal Laboratory: Essential Equipment and Conditions
Okay, now that you're convinced, it's time to turn your training roads into a laboratory. To get reliable data, you need rigor and a minimum of preparation. It's like a scientific experiment: if you change 10 parameters at once, you'll never know which one worked. The key is controlling variables.
Choosing the Course: Your Open-Air Velodrome
The choice of circuit is crucial. You need a segment of road that will become your playground, your benchmark. Here are the criteria to follow:
- Little or no traffic: Safety first! You need to be able to focus on your position and your effort, not on cars overtaking you. A passing truck can completely skew a measurement. Industrial areas on a Sunday morning are often a good bet.
- A simple and repeatable profile: The ideal is an out-and-back on a flat road or a simple loop. Why out-and-back? To cancel out the effect of a light, constant wind as much as possible. A climb is also an excellent option, as the lower speed makes wind variations less impactful. The important thing is that the start and end points are clearly identifiable (a sign, a tree, a mark on the ground).
- Sheltered from the wind: Choose a day with no wind or very light wind (less than 5-10 km/h). The wind is your worst enemy for test reliability. A slight breeze that changes direction can ruin all your efforts. Check the weather forecast before each session.
- Sufficient length: The segment should last between 5 and 10 minutes. Long enough for small steering errors to even out, but not so long that you can't do multiple repetitions without accumulating too much fatigue.
Measurement Equipment: Your Allies in the Hunt for Watts
Here, there's one non-negotiable item and a few very useful options:
- A power meter: This is the cornerstone of any serious aero test. Without it, you can't guarantee that your effort is consistent between two trials. Feel, heart rate... all of that is too variable. A power meter gives you an objective measure of the energy you're expending. It's your control point.
- A GPS computer: A Garmin, a Wahoo, or another... It will record all your data: speed, power, time, distance, cadence. It's your digital notebook. Make sure it's configured to record data every second.
- A speed sensor (optional but recommended): GPS can sometimes lose accuracy, especially under trees or between buildings. A speed sensor on your wheel hub will provide a finer and more responsive measurement of your actual speed, which is a plus for the quality of the analysis.
The Protocol: Rigor is the Key to Success
This is where your meticulous side needs to shine. Here's the checklist to follow for each test session:
- Always the same equipment: Same bike, same wheels, same helmet, same kit, same bottle position (full or empty, but always the same!). The slightest change can influence the result. If you're testing the effect of a new helmet, everything else must be identical to your baseline session.
- Tire pressure: Check it before EVERY test ride. A difference of 0.5 bar (7-8 psi) can affect rolling resistance and skew your data.
- Standardized warm-up: Always do the same warm-up of at least 15-20 minutes before starting your test runs. You need to be at the right body and muscle temperature.
- Constant target power: Choose a power output that you can easily hold for all your runs without getting tired. Typically, between 70% and 80% of your FTP. The important thing isn't to ride fast, but to ride at a constant and repeatable power.
- Obsessive documentation: Take notes! Create a small notebook or an Excel file. For each run, note the date, time, weather (wind, temperature), the change being tested (e.g., "spacers -5mm"), and the raw results (time, average speed, average power). Also, take photos or videos from the front and side for each new position. This is invaluable for remembering what you did.
The At-Home "Chung Method": A Step-by-Step Guide to Quantifying Your Gains
Now that we have the course, the gear, and the protocol, let's move on to the method. The best-known and most accessible is the field testing method popularized by Robert Chung, an American physicist and cycling enthusiast. The idea is to use the laws of physics to estimate changes in your CdA from your power and speed data. We'll look at a simplified and super-effective version.
Step 1: Establish Your Baseline Position
Before changing anything, you need a solid basis for comparison. This is your current position, the one you ride with every day. The goal of this first session is to "measure" it.
- After your warm-up, go to the start of your test segment.
- Start recording on your computer.
- Ride the segment, focusing on your target power. Stay as consistent as possible.
- Stop recording precisely at the end of the segment.
- Turn around, recover easily as you return to the start.
- Repeat the process at least 3 to 5 times.
Step 2: Isolate and Test One Variable at a Time
This is the golden rule. ONE SINGLE CHANGE PER TEST SESSION. If you change the height of your extensions AND put on a new helmet, how will you know where the speed gain (or loss) came from? Here is a list of changes to test, from the most impactful to the finest detail:
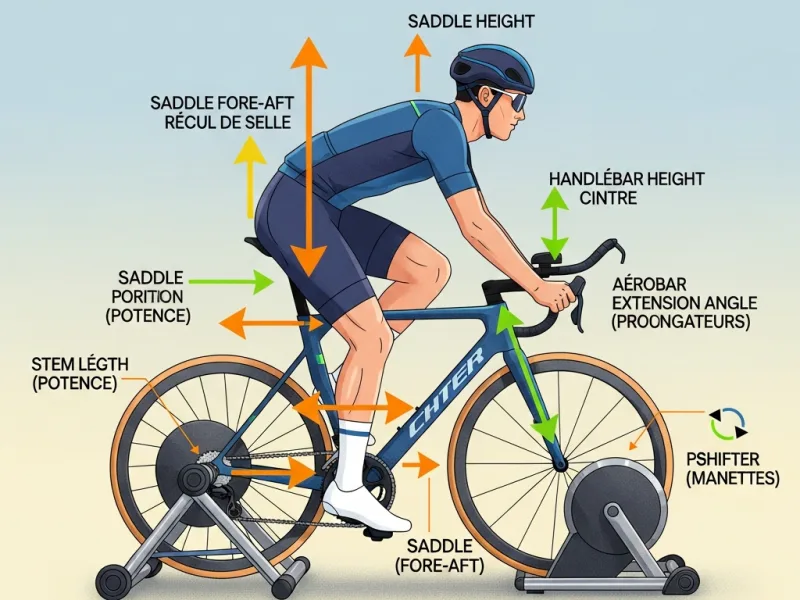
- Cockpit height (stack): This is often the biggest lever. Try removing a 5mm spacer from under your stem or armrests. Do 3 runs. Compare the results to your baseline. Be careful, lowering the handlebars can make you lose power if you're too compressed. Listen to your body.
- Armrest width: Move your armrests 1cm closer together. This reduces your frontal area. Do 3 runs. Is it faster? Do you feel stable? Can you breathe freely?
- Head position: This is a key and very dynamic point. Try one run keeping your head low, in line with your back (the famous "turtling" or shrugging position). Then another just raising your eyes to see the road. The difference can be huge.
- Hand position: Test different angles for your extensions. A "high hands" position can be very effective for some, as it fills the gap between the arms and the face.
- Helmet choice: If you have multiple helmets, dedicate a session to comparing them. Do 3 runs with your usual vented helmet, then 3 runs with an aero helmet. The difference in speed at the same power will often surprise you.
- Clothing: Compare a ride with a slightly loose jersey to another with a skinsuit or a very tight-fitting jersey. Flapping fabric acts like a mini-parachute.
Step 3: Repeat, Repeat, Repeat
Repetition is the mother of reliability. Never settle for a single trial to validate a change. A gust of wind, a moment of lost concentration, a car forcing you to deviate from your line... many factors can skew a single run. By doing at least three repetitions for each configuration (the baseline and each modification), you smooth out these anomalies. If the three trials give you very similar results (for example, average speeds of 35.2, 35.3, and 35.1 km/h), you can be confident in your average. If you get 34.5, 36.0, and 35.0, an external factor likely disrupted one of the runs. In that case, it's better to do a fourth to be sure. Patience is a virtue in the quest for aero!
Crunching the Numbers: How to Know if You've Really Made Aero Gains
You've accumulated dozens of .fit files on your computer, which is great. Now, you need to make the numbers talk. There are several levels of analysis, from the simplest to the most advanced.
Basic Analysis: Speed vs. Power
This is the most direct approach. For each change tested, you have an average power and an average speed (based on 3 or more runs). Compare them to your baseline.
- Case 1 (the simplest): Your average power is almost identical to the baseline. If your average speed has increased, BINGO! You are more aerodynamic. The change is positive.
- Case 2 (more common): Your average power has varied slightly. That's okay. You can use a simple ratio: Speed / Power. Calculate this ratio for your baseline and for your test. If the ratio is higher for your test, it indicates better aero efficiency. For example, if your baseline is 35 km/h for 200 watts (ratio 0.175) and your test gives 35.5 km/h for 202 watts (ratio 0.1757), the change is positive.
The Advanced Approach: Calculating Your Virtual CdA
If you want to go further and get a numerical measure of your aerodynamics, you can use tools that calculate your CdA. This is one of my favorite "practical gems." Software like GoldenCheetah (free and very powerful) or Connect IQ apps like Aerolab (available directly on your Garmin computer) can do the work for you. The principle is as follows: the tool takes into account your power, speed, the elevation profile of your course, your weight (cyclist + bike), and fetches the day's weather data (temperature and pressure, to calculate air density). Using the equations of physics, it isolates the portion of your power that was used to overcome air resistance and deduces an estimate of your CdA. The advantage? You get a concrete number (e.g., 0.250 m²). On your next test, if you get 0.245 m², you know you've gained 2% in aero efficiency. It's an incredibly powerful method that allows you to compare tests done on different days, as it corrects for the influence of the weather. It's the closest you can get to a wind tunnel, but on your own training ground!
The Qualitative Test: Your Feelings Don't (Always) Lie
The numbers are one thing, but never forget to listen to yourself. A position might be faster on paper for a 5-minute test, but if it causes neck, back, or shoulder pain, it's unusable over a long distance. After each change, ask yourself the right questions:
- Can I hold this position for 1 hour? 2 hours? 4 hours?
- Is my breathing smooth, or do I feel constricted?
- Do I have good visibility of the road without having to strain my neck?
- Are my hips free to move, or do I feel a blockage at the top of the pedal stroke (a sign of a hip angle that's too closed)?
- Am I stable and safe, or do I feel precarious?
Beyond Testing: Simple and Effective Aero Optimizations
Position is king, but once you've worked on it thoroughly, there are plenty of small equipment optimizations that can shave off precious seconds. These are often much more cost-effective investments than a new pair of carbon wheels.
Your Helmet: The Lowest-Hanging Fruit
If you're only going to change one item, this is it. Switching from a traditional, highly ventilated road helmet to an aero helmet can save you between 5 and 15 watts at 40 km/h. That's absolutely colossal! It's the equivalent of several months of training. There are different types of aero helmets: short-tailed (more versatile and forgiving of head movements) or long-tailed (potentially faster if you keep your head perfectly still). The best thing is to test them if you can. But in any case, a helmet that's closed on top will always be an advantage.
The Kit That Makes a Difference
We've talked about it, but it's worth repeating: clothes that flap in the wind are a disaster for aerodynamics. Investing in a time-trial suit (trisuit or skinsuit) or simply a very tight-fitting jersey and shorts (from "race fit" or "aero fit" lines) is a definite gain. Textured fabrics on the shoulders and sleeves, flat seams... all these details are designed to better manage airflow. It's a visible and measurable change. Also, think about aero shoe covers and tall socks that smooth the transition between your leg and your shoe.
⌚ EKOI Perf INSULATING FIBER Gel Memory Thermal Skinsuit
🧾 When we talk about kit that makes a difference, this skinsuit is a perfect example. It combines a "second skin" fit for optimal aero with thermal fibers for cooler conditions. No more flapping jerseys or vests that catch the wind.
- Feature 1: Extremely snug pro fit cut to minimize drag.
- Feature 2: Technical fabric that regulates temperature while remaining aerodynamic.
🎯 Ideal for: The triathlete or cyclist looking for maximum performance, even when temperatures aren't summery, without compromising on aero.
🛒 Discover the EKOI Perf INSULATING FIBER Gel Memory Thermal Skinsuit on EkoiHydration and Storage: Every Detail Counts
Look at your bike from the front. Every element that sticks out creates drag. Managing your hydration and nutrition is a key point. A bottle system placed between the extensions (BTA - Between The Arms) is almost always the fastest, as it fills an empty space and smooths airflow. A bottle on the seat tube can also be a good option. The worst? Two bottles on the down tube and seat tube, which create a lot of turbulence. For nutrition, a well-profiled "bento box" behind the stem is more aero than gels taped to the top tube. Remember to remove superfluous mounts, like a pump bracket if you don't use it.
Finding Your Sweet Spot: Don't Sacrifice Everything at the Altar of Aerodynamics
We've reached the most important point of this discussion. The pursuit of performance is not a straight line. It's a triangle with three vertices: Aerodynamics, Power, and Comfort. Ignoring any one of these will inevitably lead to underperformance.
Power Loss: The Trap of a Too-Aggressive Position
You've lowered your handlebars by 3 cm and gained 10 aero watts on paper. Victory! Except that on a one-hour ride, you realize you're producing 20 watts less than usual. The net result is negative. Why? By closing the angle between your torso and your thighs (the hip angle) too much, you can compress your hip flexor muscles and your diaphragm. The result: you produce less force and breathe less efficiently. This is why it's crucial to validate every aero change with power tests over longer efforts (10-20 minute intervals). Your fastest position is the one that gives you the best Aero/Power ratio.
Comfort is Speed Over the Long Haul
Comfort is not a luxury; it's a prerequisite for performance. An uncomfortable position creates parasitic muscle tension. Your body spends energy fighting pain instead of putting it into the pedals. In an Ironman, an unsustainable position will force you to sit up often, ruining all your aero gains. Worse, it can leave you with muscle tightness that will penalize you on the marathon that follows. Comfort allows you to stay in position, focused, and efficient for hours. Never neglect it. If you want to dig even deeper into the subject and understand all the aspects, I've written a complete guide on How to Be More Aerodynamic in Triathlon? which will give you a 360° view.
The Importance of Flexibility and Core Strength
Finally, know that your position is not set in stone. You can evolve it. By working on your flexibility (especially hamstrings and hip flexors) and your core strength (a strong trunk is essential for holding a low, stable position), you can gradually adopt more aggressive positions without sacrificing comfort or power. Integrate yoga, stretching, or Pilates sessions into your routine. It's an investment that will pay off in the long run, for both your performance and your health.
There you have it. You now have all the tools you need to embark on the exciting adventure of aerodynamic optimization. See it as a game, an exploration. Each test ride will teach you more about yourself and your machine. You'll develop a feel, an intimate understanding of what makes you faster. There is no universal "magic" position, only YOUR optimal position. It's a process, an exciting quest to find your own gains. So, ready to hunt for watts?
Ride further!
Answers to Your Questions About Home Aero Testing
Is a power meter absolutely necessary for these tests?
Yes, it's the essential tool. Without a power meter, it's impossible to guarantee that the effort expended is identical between two tests. Variations in speed could be due to an increase in effort and not an improvement in aerodynamics. The power meter is the only reliable control variable to objectively measure your gains.
How often should I test my position?
It's not necessary to test your position every week. A good approach is to do a major testing session at the beginning of the season to establish a solid position. Afterward, you can re-test if you change a major component (saddle, handlebars, helmet) or if you feel that your flexibility or physical condition has significantly evolved, for example, after a solid winter strength and conditioning block.
Can a home test really replace a wind tunnel study?
A home test won't replace the precision of a wind tunnel, which remains the gold standard. However, it allows you to identify 80% of the potential gains for 0% of the cost. For the vast majority of amateur and even experienced athletes, a well-conducted field testing protocol is more than sufficient to achieve very significant improvements and find an extremely effective position.
How do I know if my position is too aggressive and causing me to lose power?
The best way is to check it over long efforts. After validating a change on a short test, try to maintain this new position during long intervals at a target intensity (e.g., 2x20 minutes at 90% of your FTP). If you can't hold the watts you normally hold in your old position, or if you experience pain or respiratory discomfort, it's likely that the position is too aggressive for your current level of flexibility or conditioning.