IT Band Syndrome (TFL): A Return-to-Running Protocol for Trail Runners
By Sarah — translated from an article by Charly Caubaut Published on 19/05/2026 at 08h31 Reading time : 8 minutes: A Return-to-Running Protocol for Trail Runners")
That Knee Pain Ruining Your Trail Runs? Let's Talk About IT Band Syndrome.
Hey there, fellow trail enthusiast! We've all been there. You're in the middle of a run, the scenery is flying by, your legs feel great, your cardio is on point... and then, out of nowhere, it hits. A sharp pain, like a knife stabbing the outside of your knee. At first, it's just a nuisance, then it becomes a burning sensation that forces you to slow down, walk, and finally, stop dead in your tracks, completely demoralized. This is the classic signature of iliotibial band syndrome, also known as TFL syndrome or, more colorfully, windshield wiper syndrome. 😠
I know this frustration all too well. Having experienced it myself and having helped dozens of triathlete and trail runner friends through this struggle, I know how infuriating it is. It's one of the most common and stubborn injuries among runners. You feel perfectly fit, but this localized pain puts you out of commission. It feels like your body is betraying you. But let me reassure you right away: it's not a life sentence. With patience, a systematic approach, and a good understanding of the problem, you can not only recover but also come back stronger and more aware of your body's mechanics.
In this guide, we're going to break down this infamous ITBS together. No indigestible medical jargon, I promise. We'll talk straight, from one athlete to another. We'll understand why it shows up uninvited, and most importantly, we'll establish a complete battle plan, a field-tested and approved return-to-running protocol, so you can get back to your trails and peaks as soon as possible. So, ready to take back control? Let's go!
Decoding ITBS: What's Really Happening in Your Knee?
Before jumping headfirst into solutions, it's crucial to understand the enemy. Knowing what's going on under the hood is the first step to a lasting fix. Don't worry, we're not going to have a 3-hour anatomy lesson, just give you the keys to visualize the mechanism.
The "Windshield Wiper" Mechanic: A Tale of Friction
Imagine a windshield wiper on a car. With every swipe, it rubs the same spot. That's exactly what's happening on the side of your knee. The "culprit" is a long fibrous band called the iliotibial band. It runs from your hip (from the iliac crest, to be precise) all the way down your thigh to insert on the top of your tibia.
When you run, and particularly when you repeatedly bend and straighten your knee (typically between 0 and 30 degrees of flexion), this band rubs against a small bony prominence on the outside of your femur: the lateral femoral condyle. This happens thousands, tens of thousands of times per run. Normally, a small bursa is there to lubricate everything and prevent friction. But when the tension in the band is too high or the mechanics are not optimal, it rubs, it gets irritated, and it triggers inflammation. That's the pain you feel.
The TFL and the IT Band: Who's Who? (Pro Tip)
We often hear TFL and iliotibial band used interchangeably. Here's a helpful clarification:
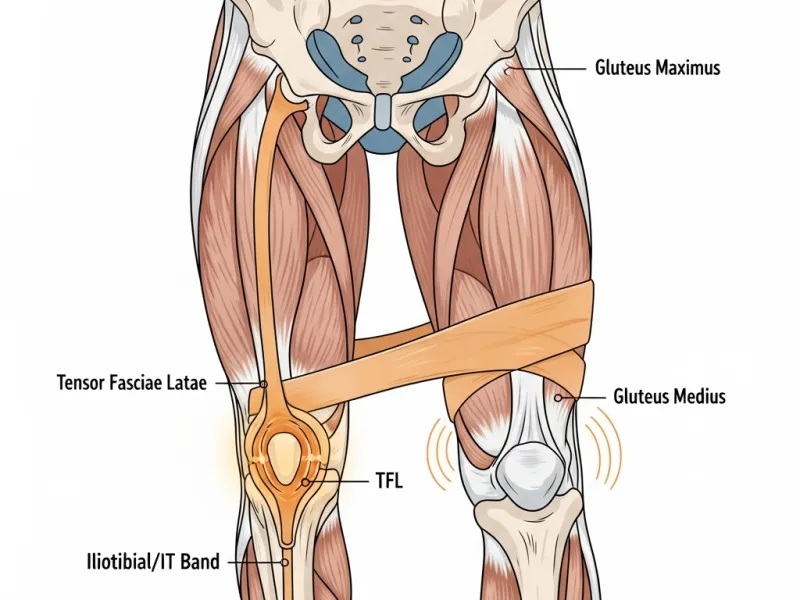
- The Tensor Fasciae Latae (TFL): This is a small muscle on the side of your hip, located high up and to the front. Its role, as its name suggests, is to tense this famous band. It's kind of the orchestra conductor.
- The Iliotibial Band (ITB): This is not a muscle! It's a long tendon, a very strong connective tissue. It is a continuation of the TFL but also of the gluteus maximus and medius. It acts as a lateral stabilizer for the hip and knee.
Understanding this is essential. Because the pain is at the knee, but the cause is very often much higher up, at the hip! You can't "stretch" the IT band itself (it's as tough as steel), but you can release the muscles that put it under tension, like the TFL and the glutes. Therein lies the key to the problem.
Why Are Trail Runners a Prime Target?
If you're a trail runner, you are particularly at risk. Why?
- Downhills: This is the number one factor! On descents, your knee works extremely hard eccentrically to brake your momentum. The knee's flexion angle remains in that infamous 30-degree "conflict zone" for a long time, increasing friction with every stride.
- Camber and Unstable Terrain: Running on a camber or on technical trails requires constant stabilization. Your hip stabilizer muscles, especially the gluteus medius, are overworked. If they fatigue, the TFL takes over, the band tightens... and the pain appears.
- Accumulated Fatigue: On long runs, muscle fatigue degrades your posture and your stride. Your pelvis can go out of alignment, your knees can collapse inward (dynamic valgus), and the tension on the IT band skyrockets. This is often why the pain only appears after an hour or two.
Now that you have a better picture of the mechanism, we can tackle the real causes. Because the friction at the knee is just a symptom. The real question is: why is it rubbing for YOU?
The Root Causes: Why You and Not Someone Else?
The pain has appeared, that's a fact. But to eradicate it for good, you need to play detective and trace it back to the source. ITBS is rarely a matter of chance. It's the result of one or more imbalances that your body has tried to compensate for... until it broke. Here are the main leads to investigate.
Weak Gluteal Muscles: Public Enemy No. 1
If you were to remember only one cause, this would be it. In our modern society, we spend hours sitting down. The result: our glutes, and particularly the gluteus medius, fall asleep. It's called gluteal amnesia. Yet this muscle is the superhero of pelvic stability. Its job is to prevent your hip from dropping on the side of your swing leg when you run.
What happens when it's weak?
- Your pelvis drops with every stride.
- To compensate and try to stabilize everything, another muscle contracts in its place: the TFL!
- The over-solicited TFL becomes stiff and tight.
- It pulls on the iliotibial band like crazy.
- The IT band, under high tension, rubs violently against the bone at the knee.
The pain is at the knee, but the ringleader is a lazy gluteus medius. This is a fundamental pro tip to internalize: 9 times out of 10, ITBS is a hip problem!
Training Management Errors
This is a classic one; we've all fallen into this trap. Your body is an incredible machine of adaptation, but it hates abrupt changes. ITBS loves to show up when you make one of these mistakes:
- Increasing volume too quickly: Going from 30 to 60 km per week in 15 days? Bad idea.
- Abruptly introducing intensity: Chaining hill repeat sessions without being prepared for them.
- A sudden explosion of elevation gain: Going for a shock weekend in the mountains with 5000m of vertical gain when you run on flat ground all year.
- Lack of recovery: Nights that are too short, back-to-back runs without giving muscle fibers time to regenerate.
Your body doesn't have time to adapt, fatigue sets in, mechanics break down, and the injury rears its ugly head. Progressivity is the trail runner's best friend.
Biomechanical and Equipment Factors
Some more personal aspects can also play a role. It's not about making excuses, but about understanding your own specificities to better manage them.
- Knee valgus: This is the tendency for your knees to collapse inward on impact. This increases the angle and therefore the tension on the IT band.
- A "crossover" gait: If your feet land on or across your body's midline, this also creates excessive tension.
- Worn-out or unsuitable shoes: Shoes that have lost their cushioning or support can alter your stride and accentuate biomechanical flaws. Pronounced wear on the outer edge of the heel should be a red flag.
The important thing is not to focus on a single cause, but to understand that it's often a cocktail of several factors. A bit of glute weakness, coupled with a big training week and shoes at the end of their life... and boom, ITBS comes knocking. Fortunately, now that we have a profile of the suspect, we can put together an action plan to kick it out.
The Return-to-Running Protocol: Your 4-Phase Battle Plan
Okay, the diagnosis is made, the causes are identified. Now, it's time for action. No more moping around, let's roll up our sleeves. I'm proposing a 4-phase protocol, progressive and logical. The key to success? Patience and diligence. Don't try to skip steps; that's the surest way to go back to square one.
Phase 1: Rest and Inflammation Management (The Smart Truce)
The first thing to do when the pain is there is to listen to it. It's an alarm signal. Trying to "run through the pain" is the worst possible mistake. You would only worsen the inflammation and prolong your downtime.
- Complete stop from running. Non-negotiable. For a few days, or even one to two weeks depending on the intensity of the pain.
- Icing: Apply ice to the painful area (the outside of the knee) several times a day for 15-20 minutes. It helps to calm the inflammation.
- Self-massage: It's time to get out the foam roller. Attention, pro tip: NEVER roll directly on the inflamed area of the knee or on the IT band at the knee. You would only irritate it more. Massage the muscles that attach to it: the TFL (on the side of the hip), the glutes, and the quadriceps (especially the vastus lateralis). The goal is to release overall tension.
- Non-impact sports: To keep your spirits and cardio up, you can turn to swimming (avoiding breaststroke, which can stress the knee) or cycling. For cycling, make sure your saddle is well-adjusted (not too high, not too low) and start with a high cadence and low resistance. If it triggers any pain, stop!
This phase lasts until the acute pain has completely disappeared in daily life (walking, climbing stairs).
Phase 2: Strengthening and Correction (Rebuilding the Foundation)
This is the most important phase, the one that will prevent you from relapsing. The inflammation has calmed down, now we attack the root causes. The goal: wake up those lazy glutes and improve the stability of the entire pelvis. You can start these exercises as soon as the acute pain is gone, even if you are not running yet.
Here is your basic routine, to be done 3 to 4 times a week:
- The Clam Shell: Lie on your side, legs bent, heels together. Lift your top knee without letting your pelvis rock backward. You should feel the contraction on the side of your buttock. (3 sets of 15 repetitions on each side)
- The Glute Bridge: On your back, feet flat, knees bent. Lift your pelvis by strongly squeezing your glutes until you form a straight line from your shoulders to your knees. For more difficulty, do it on one leg. (3 sets of 15 repetitions)
- Side-Lying Hip Abduction: Lie on your side, legs straight. Raise your top leg straight up, without momentum, controlling the descent. (3 sets of 15 repetitions on each side)
- The Side Plank: Supporting yourself on one elbow and your feet, engage your whole body to keep it straight. You're working your obliques and your gluteus medius. (3 sets of 30 to 60 seconds on each side)
At the same time, remember to stretch muscles that can be tight: the quadriceps, psoas (hip flexors), and hamstrings. Flexible muscles allow for better pelvic mobility.
Phase 3: Gradual Return to Running (Getting Back on the Trail)
The moment you've been waiting for! But we proceed with extreme caution. The golden rule: zero pain. If the pain, however slight, reappears, it means you went too fast. Take a day or two off and go back to the previous step.
- The validation test: Before running, you must be able to do single-leg squats, and go up and down stairs without any pain.
- Flat and soft surface: Start on flat, even ground (a track, towpath, grass). Forget downhills and cambers for now.
- The walk/run protocol: This is the safest method. Here is an example of progression, with 2 to 3 sessions per week and a rest day in between.
- Week 1: 5 repetitions of (4 min walk / 1 min slow run). Total: 25 min.
- Week 2: 6 repetitions of (3 min walk / 2 min slow run). Total: 30 min.
- Week 3: 5 repetitions of (2 min walk / 4 min slow run). Total: 30 min.
- Week 4: 3 repetitions of (2 min walk / 8 min run). Total: 30 min.
- Progressive increase: Once you can run for 30 minutes continuously without pain on a flat surface, you can start increasing the volume by a maximum of 10% per week. Never increase volume and intensity at the same time!
- Reintroducing elevation: Start with uphills, which put less stress on the IT band. Only tackle downhills when you are truly comfortable. Begin on gentle slopes, focusing on a light stride and a high cadence to reduce impact.
Phase 4: Prevention and Optimization (Never Go Through This Again)
You've successfully returned to running, congratulations! But the fight isn't over. The goal now is to integrate good habits so that ITBS becomes just a bad memory.
- Strengthening is for life: Keep one to two strength training sessions (glutes, core) in your weekly routine. It's your best anti-injury insurance.
- Work on your stride: Try to slightly increase your cadence (the number of steps per minute). A higher cadence reduces impact forces and ground contact time, which relieves the knee. Aim for around 170-180 steps per minute.
- Warm-up and cool-down: Never skip a good dynamic warm-up before you start (high knees, butt kicks, etc.) and some gentle stretches after your run.
- Vary your activities: Cross-training (cycling, swimming, mountain biking) is excellent. It allows you to develop your cardio and strengthen other muscle groups without creating the same stresses as running. To learn more about prevention in general, I've also written a complete guide on running injuries.
- Listen to your body: Your body sends you signals. A little niggle? Don't wait for major pain. Back off, do a strength session, massage yourself. One day of preventive rest is better than two months of forced layoff.
There you have it, you have all the cards in your hand. This injury can be a blessing in disguise, an opportunity to get to know yourself better, correct your weaknesses, and become a more complete and resilient runner. It's a long process, but it's well worth the effort. Patience is your best ally.
Now it's your turn!
Your Questions About IT Band Syndrome
Can I continue to cycle with IT band syndrome?
Yes, cycling is often an excellent substitute activity because it is a non-impact sport. However, you must be careful. An improper saddle setup (too high or too low) or cleat position can replicate a frictional movement and irritate the IT band. The golden rule is the same: if you feel the slightest pain, stop. Opt for a high pedaling cadence with low resistance to minimize stress on the knee.
Is foam rolling the iliotibial band itself really effective?
This is an important point. It is generally advised against and even counterproductive to roll directly on the iliotibial band, especially near the painful area by the knee, as this can increase inflammation. However, the foam roller is extremely effective for releasing the muscles that attach to the IT band and put it under tension: the Tensor Fasciae Latae (TFL) on the side of the hip, and the gluteal muscles. By relaxing these muscles, you reduce the overall tension on the band.
How long does it take to fully recover from ITBS?
There is no single answer, as it depends on the severity of the initial inflammation and how rigorously you follow the protocol. For a mild inflammation that is treated quickly, you can hope to gradually return to running in 2 to 4 weeks. For more severe or chronic cases, it can take 6 to 8 weeks, or even longer. Patience is key. Trying to come back too quickly is the surest way to trigger a relapse and start another long layoff.
Could my trail running shoes be the cause of my ITBS?
They can be an aggravating factor, but rarely the sole cause. Worn-out shoes lose their cushioning and stability, which can accentuate an existing biomechanical flaw (like excessive pronation or ankle instability) and increase stress on the knee. If your shoes have more than 800-1000 km (500-600 miles) on them or if you notice significant wear on the outer edge of the heel, it's probably time to replace them. However, remember that the main cause is most often a deficit in strength and control at the hips.