'Square Pedaling': How to Smooth Your Pedal Stroke to Gain Power
By Sarah — translated from an article by Charly Caubaut Published on 03/11/2026 at 07h31 Reading time : 10 minutes
Do you feel like you're mashing the pedals but not gaining speed? Welcome to the club!
I still remember that frustrating feeling during my first few years in triathlon. I'd be tackling a climb, thighs burning, short of breath, feeling like I was hammering my pedals as if I wanted to break them. I was giving it my all, but my smoother friends seemed to fly away. My coach at the time looked at me, a smirk on his face, and said, "Charly, you have a magnificent square pedal stroke!" At first, I thought it was a joke. But I quickly understood that he had just put his finger on THE biggest area for improvement in my cycling progress. That feeling of "stomping" on the pedals instead of guiding them is the infamous "square pedaling."
It's a very common issue, whether you're a beginner or an experienced cyclist. We focus so much on the downstroke, that moment when we push the pedal down, that we forget the rest of the cycle. The result? We lose a phenomenal amount of energy, get tired faster, and stagnate in terms of power. But the good news is that it's not a life sentence. Far from it! Transforming this jerky motion into a round, fluid, and efficient pedal stroke is within everyone's reach. It takes patience and body awareness, but the gains are so enormous that it changes a cyclist's life.
In this article, we're going to break down this phenomenon together. We'll learn to identify it, understand the biomechanics of an efficient pedal stroke, and most importantly, I'll share all my practical golden nuggets with you: concrete exercises, tested and approved over thousands of kilometers, so that you too can finally feel that magical fluidity that will make you ride faster, for longer. So, saddle up, we're off to conquer the perfect pedal stroke!
Understanding the Myth of "Round Pedaling" vs. the Reality of Square Pedaling
Before diving into the exercises, it's crucial to understand what we're talking about. We often hear about "round pedaling" as the Holy Grail. The idea would be to apply equal force through 360°. Let's be clear: that's a myth. No one, not even the pros, pushes and pulls with the same force. The reality is that the downstroke will always be the most powerful phase. The real goal is to *minimize power loss* in the other phases of the cycle and to distribute the effort across more muscle groups.
What exactly is "square pedaling"?
Imagine your pedal stroke as drawing a geometric shape. Square pedaling is when you push violently from top to bottom (the first side of the square), then nothing until the other leg takes over and does the same thing (the third side). The transition phases at the bottom and top are dead spots, moments when you produce no power, or even slightly brake the motion. It's a two-beat cycle: Push / Dead Spot / Push / Dead Spot. It's terribly inefficient.
- Wasted energy: All the power is concentrated over a short period and on a single main muscle group (the quadriceps).
- Premature fatigue: Your quads are overworked and end up burning out very quickly, especially on climbs or during intense efforts.
- Joint wear and tear: The jerky movements and poorly distributed pressure can create unnecessary stress on the knees and hips.
- Limited power: You're only using a fraction of your potential. By smoothing your pedal stroke, you apply force for longer, which directly translates into more watts for the same cardiac effort.
The pedal stroke cycle: much more than a simple push
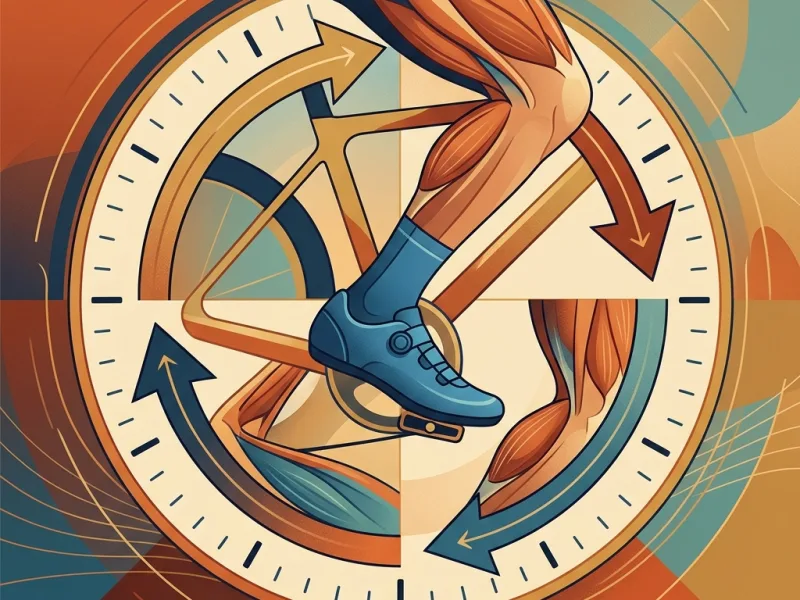
To visualize the ideal pedal stroke, we often use the analogy of a clock face. One full pedal revolution is one turn of the clock. Each phase has its role and engages different muscles. It's the coordination of these phases that creates fluidity.
- The Power Phase (from 1 to 5 o'clock): This is the king phase, the most intuitive one. You push the pedal forward and down. Here, the quadriceps and gluteus maximus are the stars. This is where you generate peak power. The mistake of the square pedaler is to ONLY do this.
- The Bottom Transition Phase (from 5 to 7 o'clock): This is the first dead spot. Instead of leaving your foot inert, the idea is to "scrape" backward, as if you were trying to wipe mud off the bottom of your shoe. This gesture, initiated by the calf and ankle, allows you to get through the bottom dead spot without braking the pedal and prepares for the upstroke.
- The Upstroke Phase (from 7 to 11 o'clock): This is the most counter-intuitive and difficult phase to master. It's not about pulling up on the pedal like a maniac, but rather about "unweighting" it. By lifting your knee towards the handlebars, you use your hamstrings and hip flexors. The goal is simple: to allow the pushing leg not to have to also lift the weight of the other leg. It's a net gain in efficiency!
- The Top Transition Phase (from 11 to 1 o'clock): The second dead spot. Here, the idea is to "push" the foot forward, as if you were giving a little kick over the top of the crank axle. This movement engages the tibialis anterior muscle and prepares the next power phase to be as effective as possible right from the start.
Why smoothing your pedal stroke is a game-changer
By coordinating these four phases, you turn the square into a circle. The benefits are immediate and long-lasting. You're no longer pedaling just with your thighs, but with your entire leg: glutes, quadriceps, hamstrings, calves, and even your hip flexors. By distributing the effort, each muscle group works less intensely, which significantly pushes back the fatigue threshold. You become a more enduring and efficient machine. For the same energy cost, you produce more continuous power. This is the key to improving your times, going the distance in an Ironman, or simply having more fun on long rides with friends.
Diagnosing Your Own Pedaling: Are You a "Square Pedaler"?
Now that the theory is clear, let's get practical. How do you know if this applies to you? There are tell-tale signs, and tools that can confirm it in black and white.
The unmistakable signs on the road
Pay attention to your sensations on your next ride. Be honest with yourself:
- The "popcorn" syndrome: When you try to increase your cadence (say, above 95-100 RPM), do your hips start bouncing on the saddle? This is a sign that you can't coordinate the leg's upstroke. You're pushing down so hard that your body is thrown upward with each pedal stroke.
- The "thump-thump" rhythm: Listen closely to the sound of your drivetrain. A square pedal stroke produces a jerky sound. A fluid pedal stroke is almost silent, a steady hum. You can also feel this pulsation throughout your body.
- Quads on fire: On a long, steady climb, which muscles cry for mercy first? If it's consistently your quadriceps, while your glutes and hamstrings seem fine, it's a major clue that you're only pedaling with the front of your thighs.
- The "gap" at the top of the pedal stroke: Do you feel a brief moment of nothingness, a microsecond where nothing happens, just before you stomp on the pedal? That's the top dead spot that you're failing to get through smoothly.
Modern tools at your service: sensors and data
Sensations are good. Data is even better for objectifying the problem and tracking your progress. If you have the gear, here are a few practical gems to analyze:
- Cadence sensor: This is the basics. A very unstable cadence on flat ground is a first clue. If you struggle to maintain a 90 rpm cadence without bouncing, it's an area to work on.
- Power meter (with advanced analysis): This is the ultimate tool. Most modern power meters (pedals, cranksets) paired with a good GPS computer give you access to incredibly rich data:
- Torque Effectiveness (TE): This percentage measures how much of the force you apply actually contributes to moving the crank forward. A score of 100% would mean you produce no negative force (which brakes the pedal, especially during the upstroke). Pros are around 70-85%. An amateur cyclist with a square pedal stroke will often be below 60%.
- Pedal Smoothness (PS): This percentage compares your average power over a pedal revolution to your maximum power during that same revolution. A 100% score would be a perfect circle (the myth!). A good goal is to aim for between 20% and 30%. Below 15%, your pedal stroke is very likely jerky.
- Left/Right Balance: A significant imbalance (e.g., 45/55) can also reveal poor technique on one side, often the less coordinated side.
The simple "one-legged pedaling" test
This is my favorite test. It's ruthless but incredibly revealing. Get on an indoor trainer (it's safer!). Warm up well, then unclip one foot and rest it on the side. Try to pedal with just one leg for 30 seconds. Choose a low resistance.
What happens? If you feel monstrous jerks, if you struggle to get through the top and bottom dead spots, if the pedal "falls" abruptly with each revolution... bingo! You've just highlighted all the weaknesses in your pedal stroke. Fluid one-legged pedaling is difficult, but it should be possible without it feeling like a street fight. Repeat the test with the other leg. You might be surprised to see a difference in coordination between your two sides.
The Practical Nuggets: Exercises and Techniques to Round Out the Edges
OK, the diagnosis is in. Don't panic, this is where the fun begins! Here is a series of exercises I practiced for years to transform my pedaling. The key? Consistency and focus.
On the Indoor Trainer: The Perfect Pedaling Laboratory
The indoor trainer is your best friend for this technical work. No traffic, no red lights, no wind... You can focus 100% on your sensations and the movement. I recommend dedicating one session per week to this quality work.
Exercise 1: Single-Leg Drills
We're using the test from before, but turning it into an exercise. The goal is no longer to test yourself, but to improve.
- The protocol: After a good warm-up, start with 5 sets of 30 seconds on the right leg, followed by 30 seconds of recovery pedaling with both legs. Then do the same with the left leg. Repeat the whole thing 2 or 3 times.
- The focus: During the 30 seconds, don't think about power. Think about the CIRCLE. Mentally break down the movement: I push forward (11h-1h), I stomp down (1h-5h), I scrape back (5h-7h), I lift the knee (7h-11h). Visualize the movement. Feel the muscles activating.
- The progression: At first, you'll probably struggle. That's normal! Start with very low resistance and a slow cadence (60-70 rpm). Over the weeks, try to increase the duration (45s, then 1 minute) or the cadence, while remaining perfectly smooth.
Exercise 2: Cadence Pyramids
This exercise aims to improve your neuromuscular coordination at high speed.
- The protocol: On low to moderate resistance, start pedaling at a comfortable cadence (e.g., 85 rpm) for 2 minutes. Then, increase by 5 rpm every minute (90, 95, 100, 105...).
- The goal: Go as high as you can in cadence WITHOUT starting to bounce on the saddle. Be hyper-focused on your hips: they must remain stable. As soon as you feel yourself starting to bounce, you've reached your technical limit for the day. Then, come back down step by step.
- The progression: The first time, you might start bouncing at 105 rpm. The goal, week after week, is to push that limit to 110, 115 rpm, etc. You're teaching your brain to send the right signals to your muscles much more quickly.
Exercise 3: "No-Hands" Pedaling
A simple but formidable exercise to work on your core, which is the foundation of an efficient pedal stroke.
- The protocol: On the indoor trainer, in a stable position, try to let go of the handlebars and pedal for 30 to 60 seconds, keeping your torso upright or slightly bent, with your arms by your sides or crossed over your chest.
- The goal: Your body will have to engage all the stabilizing muscles of your core (abs, obliques, lower back) to stay together. A solid core ensures that 100% of the power developed by your legs is transferred to the pedals, without being lost in parasitic movements of the upper body.
Outdoors: Applying the Technique in Real Conditions
Work on the indoor trainer is essential, but you then need to transfer these skills to the road.
- Focus on sensations: Integrate pedaling "mantras" into your rides. For 5 minutes, focus solely on one sensation. For example: "for 5 minutes, I'm only thinking about scraping with my feet at the bottom dead spot." Then 5 minutes on lifting the knee, etc. These conscious reminders will gradually become automatic.
- Vary the terrain: False flats are perfect for working on strength throughout the entire cycle. Gentle descents are ideal for working on high cadence and suppleness. Don't always stick to the same route.
- Riding out of the saddle: When you get out of the saddle, try not to just swing the bike from side to side. Think about pulling on the handlebar as the opposite pedal comes up. This body-bike synchronization also contributes to the fluidity of your pedal stroke.
Strength Training: The Foundation of Power
Improving your pedal stroke doesn't just happen on the bike. A powerful cyclist is a complete athlete. To pull up on the pedals effectively, you need muscles capable of doing it!
- Core work: This is non-negotiable. Incorporate 2 to 3 sessions of 10-15 minutes of core work per week (plank, side plank, etc.). A rock-solid core is the best power transmission there is.
- Posterior chain muscles: Your hamstrings and glutes are the engines of the upstroke phase. Strengthen them! Exercises like deadlifts, lunges, hip bridges, or kettlebell swings are practical gems for building a more balanced pedal stroke.
Equipment: An Ally, Not a Miracle Solution
We all love nice gear, myself included! But it's important to understand that the best bike in the world won't correct a bad pedal stroke. The equipment is there to allow you to apply the right technique, not to create it.
Proper bike setup (bike fitting)
This is the absolute starting point. If your saddle is too high or too low, if your saddle setback is incorrect, your body will compensate, and it will be physically impossible for you to pedal correctly. A saddle that's too high, for example, will prevent you from getting through the bottom dead spot properly and will force your ankle into excessive extension. A saddle that's too low will limit the power of your quadriceps. Investing in a professional bike fit is probably the best money you will spend on your cycling.
Clipless pedals: essential?
To seriously work on your pedal stroke, the answer is an unhesitating yes. They are the physical link that allows you to act on the pedal during the upstroke phase. Without them, it's impossible to "lift" the pedal. Whether you choose Look, Shimano, Speedplay, or another brand, the important thing is to be comfortable with the system and to set the release tension correctly for your safety.
Power meters and GPS watches: your personal coaches
As we've seen, data is your ally to objectively measure your progress. No more flying blind. Modern tools allow you to track your cadence, power, and even advanced pedaling dynamics in real time. It's an investment, but if you're serious about your progress, it's an incredible tool for self-knowledge.
Action Plan: Integrating Pedal Stroke Work into Your Training
Theory is good, a plan is better! Here's how you can integrate all of this into your training week without revolutionizing everything.
Example of a typical week for a motivated triathlete or cyclist
The idea is to integrate technical reminders into your existing sessions.
- Session 1 (Tuesday - Indoor Trainer - Quality):
- 20 min progressive warm-up.
- Technique Block (15 min): 3 x (1 min right leg / 1 min left leg / 1 min both legs, easy spin). Total focus on fluidity.
- Main Set: For example, threshold intervals. During these intervals, your goal is to maintain the roundest possible pedal stroke despite the intensity. Bad habits creep back in when you're tired! This is an excellent way to reinforce good motor patterns. To learn more about this type of effort, you can consult our complete guide to FTP.
- 15 min cool-down, spinning at a high cadence (100-105 rpm).
- Session 2 (Thursday - Endurance Ride):
- 1h30 to 2h ride at an easy, conversational pace.
- Technique Focus: Every 15 minutes, dedicate 5 minutes to a specific aspect of the pedal stroke. 5 min focus on "scraping at the bottom," then 15 min of normal pedaling, then 5 min focus on "lifting the knee," etc.
- Session 3 (Saturday - Long Ride):
- The goal here is endurance, but there's no reason not to slip in some technique.
- Exercise: On a long, not-too-steep climb, try to stay seated and focus on applying force throughout the entire cycle to maintain fluidity. This is an excellent exercise to feel the help from your hamstrings and glutes.
Patience and consistency: your best allies
I'll be honest with you: you're not going to fix your pedal stroke in a week. It's a long-term effort that requires discipline. You'll have to fight against years of bad habits. There will be days when you feel like you're regressing. That's normal! The body has a memory, and it takes thousands and thousands of repetitions to teach it a new movement. Even myself, after more than 20 years of cycling, I continue to do technical drills every winter. It's like a musician practicing their scales. It's the foundation of everything.
Don't get discouraged. Film yourself on the indoor trainer at the beginning of the process, and then 3 months later. Look at your torque effectiveness and smoothness data. The progress will be there. Celebrate every small victory: that first time you managed to hold one-legged pedaling for a minute without jerking, that ride where you felt your hamstrings working for the first time... It's the sum of these small successes that will build your new pedal stroke.
So, ready to round out the edges?
There you have it, you now have all the tools to say goodbye to square pedaling. You understand the mechanics, you know how to diagnose yourself, and you have a toolbox full of practical nuggets to help you improve. Never forget that every pedal stroke is an opportunity to get better. It's not just about raw performance; it's also a quest for sensation, fluidity, and harmony with your machine. It's about finding that rhythm where the effort feels easier, where you feel like you're flying down the road. That's the magic of cycling.
So don't put pressure on yourself. Have fun with these exercises, explore your sensations, be curious about your own body. Progress will come naturally with practice and patience. And soon, you'll be the one smiling when you see a friend "stomping" on their pedals, and you'll be able to share these tips in turn.
It's your turn to play!
Answers to your questions about the pedal stroke
What is the ideal pedaling cadence?
There is no single magic cadence, as it depends on your physiology, the terrain, and the type of effort. However, most amateur cyclists tend to pedal with too low a cadence (mashing gears). Aiming for an average cadence between 85 and 95 RPM on the flats is an excellent goal for the majority. This provides a good compromise between muscular and cardiovascular demand and promotes a smoother pedal stroke.
Is a power meter absolutely necessary to improve my pedaling?
No, it's not essential, but it's a fantastic progress accelerator. You can perfectly improve your pedal stroke based on your sensations and exercises like single-leg pedaling. However, a power meter with pedaling dynamics analysis will give you objective, numerical feedback (torque effectiveness, smoothness) that is impossible to get otherwise. It's a tool that allows you to validate your sensations and track your progress very precisely.
One-legged pedaling seems impossible, what should I do?
This is a very common reaction! If it's too difficult, start with very short intervals (15-20 seconds) with almost no resistance. The important thing isn't to produce power, but to survive the pedal revolution. Focus solely on getting through the top and bottom dead spots. You can also help yourself by thinking of "kicking" your foot over the top and "scraping" at the bottom. With regular practice, even just a few minutes a week, your neuromuscular system will adapt, and the exercise will become easier and easier.
How long does it take to correct a square pedal stroke?
You have to be patient. Correcting a motor pattern that's been ingrained for years takes time. Don't expect a radical change in one week. By incorporating 1 to 2 technical sessions per week, you should start to feel a real difference after 4 to 6 weeks. However, for "round pedaling" to become a complete, automatic habit, even when fatigued, it can take several months, or even a full season. The key is consistency and focus during the exercises.