Gilet-Packing: The Art of Organizing Your Trail Pack for Performance
By Sarah — translated from an article by Anthony Anne Published on 03/03/2026 at 07h01 — modified on 09/03/2026 at 18h08 Reading time : 9 minutes
The Trail Vest: Much More Than Just a Backpack
Hello to you, trail friend! Today, we’re going to talk about a subject that’s particularly close to my heart, one of those details that, believe me, is not a detail: the organization of your hydration vest. I’ve named this 'Gilet-Packing'. It may seem a bit technical, but it's a true art that can transform your running experience, whether you're off for a 20 km race or a 160 km epic journey through the mountains.
I still remember my beginnings, when my bag looked like a big catch-all. An energy bar stuck at the bottom, the headlamp tangled with the emergency blanket, and that horrible feeling of having to stop and empty everything in the rain to find my jacket... Frustrating, right? I made those mistakes so you don't have to. I learned the hard way that on the trails, every second counts, every action must be optimized. A well-organized vest leads to a clearer mind, less stress, and more energy to focus on the essentials: putting one foot in front of the other and enjoying the scenery.
Gilet-Packing isn't just about stowing your gear. It's a strategy. It's anticipating your needs, knowing your gear inside and out, and creating a system so fluid that it becomes second nature. It’s the difference between enduring your race and mastering it. Ready to take on the challenge? Come on, follow me, and I’ll show you how to become a master in the art of organizing your vest.
Why is 'Gilet-Packing' a Crucial Skill in Trail Running?
You might think that what matters is what's in your legs and in your head. And that’s true! But your vest is your mobile base camp, your lifeline. Neglecting it is like setting off on an expedition with an unreadable map. Here’s why this skill is fundamental.
Gaining Efficiency and Energy
Imagine this scenario: you're in the middle of a climb, your heart rate is high, and you feel a little hunger pang coming. If your gel is accessible within three seconds on your strap, you consume it, take a sip, and continue your effort without breaking your rhythm. Now, imagine that same gel is at the bottom of a zipped pocket in your back. You have to slow down, maybe stop, twist your arm, search blindly... You're wasting time, energy, and above all, concentration. Multiply that by the number of times you need to eat, drink, or take out an accessory on an ultra, and you quickly realize that the difference can be counted in tens of minutes, and in a significant mental load.
Safety and Responsiveness
Out on the field, nothing replaces experience, and experience teaches us that mountain weather changes quickly. Very quickly. A storm breaks, a sudden drop in temperature... If your rain jacket is immediately accessible, you can put it on in less than 30 seconds and stay dry. If it’s packed at the bottom of the bag under everything else, by the time you get it out, you’re already soaked and at risk of hypothermia. Gilet-Packing is also a matter of safety. Knowing where your whistle, emergency blanket, or spare headlamp is can make all the difference in an emergency.
Comfort and Injury Prevention
An unbalanced vest is a source of problems. Poorly distributed weight will bounce around, creating friction and painful irritations on the shoulders or back. Over time, this constant swaying can even lead to contractions in the trapezius and neck, forcing you to expend a lot of energy to stay stable. Good Gilet-Packing aims to create a compact, stable unit that feels like part of you. Heavy items (like a full hydration bladder) should be pressed against your back and centered for optimal balance.
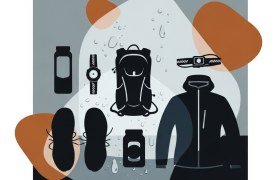
Choosing the Right Trail Vest: The Foundation of Everything
Before even thinking about organization, you need to choose the right tool. Not all vests are created equal, and the perfect model for a 25 km trail will cause problems on a 100-mile run. Here are the essential criteria to consider.
Volume: Every Distance Has Its Capacity
The volume of a vest, expressed in liters, determines its storage capacity. It’s not about taking the biggest one thinking "who can carry more can carry less." A vest that’s too large and not filled will be unstable.
- 2 to 5 liters: Perfect for short outings (up to 2-3 hours) or short trails (20-30 km) with little mandatory gear. This is the minimalist format for carrying water, a few gels, your phone, and your keys.
- 8 to 10 liters: The most versatile volume. Ideal for trails of 40 to 80 km. It allows you to carry the classic mandatory gear (jacket, rain pants, emergency blanket) while remaining compact and light. It’s the preferred choice of many runners for marathon-mountain formats.
- 12 to 15 liters (or more): The vest for ultras. When the list of mandatory gear grows (down jacket, spare headlamp, external battery, food for long sections...), this volume becomes essential. It provides the necessary space for no compromises on safety, especially for races with demanding weather conditions or in semi-autonomy.
Fit and Ergonomics: The Rule of 'Zero Bounce'
A trail vest should be like a second skin. When you try it on, load it a bit and jump up and down. Nothing should move. Here are the points to check:
- Adjustment Straps: There should be straps on the sides (to adjust the volume) and at the sternum level (for support). Sternum straps are often elastic and adjustable in height to fit your build and not hinder your breathing.
- Shape: The straps should be wide and fit your shoulders well without creating pressure points. The vest should rise high enough on the back to properly distribute the load.
- Materials: Look for breathable fabrics ("mesh") on the back and straps to wick away sweat. Stretch materials are a plus, as they allow pockets to adapt to the contents while holding it firmly.
Access to Pockets: The Key to Fluidity
Look at the arrangement of the pockets. The goal is to access 80% of your gear without removing the vest.
- Front Pockets (on the straps): Essential. This is where you’ll store your hydration (flasks), your quick-access nutrition, and your phone. They should be easy to open and close.
- Side Pockets: Very useful for storing gloves, a beanie, or your waste.
- Back Pockets: There’s often a large main pocket for bulky gear and sometimes secondary pockets for better segmentation. A kangaroo pocket (accessible from both sides at the lower back) is a real plus for quickly storing or retrieving a jacket.
The Art of Distribution: My 'Gilet-Packing' Strategy by Zones
Now that you have the right vest, let’s get to the heart of the matter: how to fill it intelligently? I’ve developed a simple method I call "zoning". It involves dividing your vest into three accessibility zones. It’s a simple principle that will revolutionize your race management.
Zone 1: Immediate Access (Front Straps)
This zone is your dashboard. Everything in it should be accessible with one hand, while running, without even thinking about it. This is the action zone.
- Hydration: Your two flasks (usually 500ml each) are here. One for plain water, the other for sports drink. This is non-negotiable.
- Quick Nutrition: In the stretch pockets beneath the flasks, I place the next 2-3 gels or bars I plan to consume. The goal is never to have to search. You know you need to eat in an hour? The gel is already there, ready to be drawn.
- Phone: In a zipped and secure pocket, usually on one of the straps. For photos, GPS tracking, or emergency calls.
- Reusable Cup: Attached or folded in a dedicated small pocket. At aid stations, every second counts!
- Whistle: It’s often integrated into the vest, within mouth reach. Check where it is.
Zone 2: Quick Access (Side and Lower Back Pockets)
This zone contains gear you might need without warning, but not constantly. You can access it while running or walking, with a little twisting effort, but without putting down the bag.
- Gloves, Beanie, Neck Gaiter: If the weather cools, you can grab them quickly.
- Headlamp: If you’re running at dusk or night approaches, you can take it out and put it on without stopping.
- One or Two Emergency Energy Bars: In case you have an unexpected drop in energy.
- Your Waste: One of the side pockets should be dedicated to holding the wrappers of your gels and bars. Nature thanks you! 🙏
Zone 3: Main Storage (The Big Rear Pocket)
This is the hold of your plane. Everything mandatory or comfort gear that is used occasionally goes here. Organization here is crucial for stability and for finding your stuff during a longer stop at an aid station.
The golden rule: the heaviest items closest to your body. The water bladder (if you use one) should be in the compartment pressed against your back. Then, the rest of the gear, storing the items you are least likely to use first.
- At the bottom against the back: The waterproof jacket and rain pants. These are often the densest items. Fold and compact them well.
- Above: The warm second layer (fleece or down jacket), the emergency blanket, the first aid kit.
- In the sub-pockets or on top: The external battery, the spare headlamp, your identity documents, a bit of money.
Pro tip: use small ziplock bags to compartmentalize and waterproof your gear (papers, electronics, first aid kit). It’s light, inexpensive, and ultra-effective.
The Detailed Content: What to Put in Your Vest?
Knowing where to store is good. Knowing what to bring is even better. Let’s review the essentials and the little extras that make a difference.
Hydration: Soft Flasks vs. Water Bladder
This is the big debate! Each has its advantages:
- Soft Flasks:
- Advantages: Easy to fill at aid stations, allows you to see the remaining amount, can alternate water and energy drink, no "floc-floc" sound as they compress when emptied.
- Disadvantages: Limited capacity (generally 2x500ml), need to take them out of the pockets to fill.
- Water Bladder:
- Advantages: Large capacity (1.5L to 2L), ideal for long sections without water points, allows small sips regularly without effort thanks to the straw.
- Disadvantages: Difficult to fill while on the move (you often need to take off the bag), you can't see well what’s left, cleaning is more cumbersome, and the notorious sloshing sound if it’s not full.
My advice? For most races up to 80-100 km with regular aid stations, the two flasks at the front are the most effective solution. For very long ultras, in semi-autonomy or in the desert, the water bladder becomes a very relevant option, sometimes in addition to the flasks.
Nutrition: Plan to Avoid Surprises
Your vest is your pantry. Never leave saying "I’ll see at the aid stations." Always have a plan.
- Organization: Store your nutrition logically. For example, gels on the left, bars on the right. Or, organize by time: products for the first 3 hours in the most accessible pockets, the rest a bit further back.
- Diversity: Alternate sweet (gels, fruit pastes) and savory (crackers, purees, broth). Your stomach will thank you in the long run.
- Test Everything in Training: Never, ever, try a new product on race day. It’s the best way to expose yourself to digestive troubles.
Mandatory Gear: Your Insurance Policy
Every race has its own mandatory gear list. Verifying it is your first mission. It’s non-negotiable, your safety depends on it. For a comprehensive view, I invite you to read my complete guide on the subject: Ultra-Trail: The Complete Gear Checklist for Safe Running. Here are the classics:
- Waterproof Jacket: With a Gore-Tex type membrane (or equivalent) and sealed seams. The waterproof rating (in Schmerber) and breathability (MVTR) is often specified in the regulations. Don't skimp on quality, it’s your best protection against cold and rain.
- Emergency Blanket: It weighs nothing and can save your life.
- Charged Phone: With the organization's numbers saved.
- Water and Food Reserve: Even when leaving an aid station, you must have a minimum with you.
The Little "Extras" of Experience
Over the years, my “just in case” pocket has been fine-tuned. Here’s what it contains:
- A small tube of anti-chafe cream.
- A few paracetamol tablets (to be used sparingly and with discretion).
- Plasters for blisters and a small adhesive bandage.
- A lip balm with sun protection.
- A small garbage bag to keep everything clean. It’s the basic respect for the mountains.
Practical Scenarios: Adapting Your Gilet-Packing to the Distance
Each has its own adventure, and each adventure has its Gilet-Packing. You don't take the same things for a sprint across the ridges as for a 30-hour traverse.
Scenario 1: The Short Trail (20-30 km)
- Vest: 2 to 5 liters.
- Hydration: Two 500ml flasks are more than enough.
- Nutrition: 3 to 5 gels or bars, depending on the estimated duration.
- Gear: The strict minimum. The phone, keys, maybe an ultralight windbreaker if the weather is uncertain. It’s the realm of effective minimalism.
Scenario 2: The Long Trail / Marathon Format (40-80 km)
- Vest: 8 to 10 liters.
- Hydration: The two flasks remain the base. You can add a third, empty and folded, to fill if a section between two aid stations is particularly long or hot.
- Nutrition: A well-established plan. You bring enough to last between aid stations, with a small safety margin.
- Gear: Here, you carry the standard mandatory gear: rain jacket, emergency blanket, headlamp (if starting early or arriving late), gloves, beanie... Zone 3 starts to fill up nicely.
Scenario 3: The Ultra-Trail (100 km and more)
- Vest: 12 to 15 liters.
- Hydration: Flasks, often supplemented by a water bladder for very long sections.
- Nutrition: You take a real variety of products. Taste fatigue is a real enemy in ultra.
- Gear: The list is long and must be followed to the letter. You often add rain pants, a warm second layer, a spare headlamp with replacement batteries, an external battery, spare clothes in a waterproof bag... Organization must be precise. Managing stops at rest areas, where you can recharge your pack, becomes a discipline on its own.
My Coach Tips for Perfect 'Gilet-Packing'
To conclude, I’m sharing a few secrets, those little tricks that will make you a real pro with your vest.
Repetition is the mother of automation. Don’t prepare your bag for the first time the night before the race. Do it and redo it. Take your gear out, put it away, memorize the location of each item. Your brain should instinctively know where your jacket is without you even thinking about it.
Test in Real Conditions. The best way to validate your Gilet-Packing is to use it. Go for your long weekend outing with the bag configured as you would for the race. It’s an opportunity to see if nothing moves, if everything is accessible, and if the weight is well distributed. Train yourself to drink, to eat, and even to take out your jacket while running. On the trail, nothing replaces experience!
Post-race organization is just as important. Once you cross the finish line, don’t throw your vest in a corner in a pile. Empty it completely. Clean the flasks and water bladder (a crucial step to avoid the development of bacteria). Wash the vest (by hand, in cold water) and let it air dry. Check the condition of your gear: does the headlamp work? Is the first aid kit complete? This is the assurance of being always ready for the next adventure.
Conclusion: Your Vest, Your Best Ally
You understand, 'Gilet-Packing' is much more than just a logistical chore. It’s an integral part of your performance and enjoyment in trail running. A well-thought-out vest means peace of mind, efficiency, and safety. It’s one less weight on your shoulders, both literally and figuratively.
So, the next time you prepare your things, take the time to think about these zones, accessibility, and weight distribution. Do some trials, adjust, personalize. Make your vest an extension of yourself, a faithful ally that will carry you to the finish line. It’s an art that is learned and perfected with every outing.
Now, it’s your turn to take action. Experiment, find the system that works best for you. Because in the end, the best rule is the one that works for you. To each their adventure!
🧠 FAQ - The 'Gilet-Packing' FAQs
❓ How to avoid the sound of water (sloshing) in the flasks or water bladder?
For soft flasks, the problem resolves itself: they compress as you drink, leaving no air inside. For a rigid water bladder, the trick is to fill it completely, then turn it upside down (pipe facing up) and suck out all the air until the water reaches the straw. This creates a vacuum and eliminates almost all sloshing noise.
❓ Flasks or water bladder, what to choose for an ultra-trail?
There’s no one-size-fits-all answer, it depends on the course profile and your preferences. The flasks (2x500ml or 2x600ml) are often favored for their ease of filling at aid stations and the ability to vary drinks (water/sports drink). The water bladder (1.5L to 2L) is interesting for very long sections without water points or in high heat. Some runners even combine both: a water bladder filled with plain water and a flask for the energy drink.
❓ How to store trail poles on the vest?
Most modern trail vests offer carrying systems for poles. The most common options are: at the back horizontally, at the back vertically in a quiver, or at the front vertically along the straps. Test the different options in training to find the one that allows you to store and retrieve your poles the quickest and most comfortably.
❓ How often and how to clean a trail vest?
Ideally, you should rinse your vest with clear water after each long outing to remove sweat and salt, which can degrade the materials. For deep cleaning, wash it by hand in warm water with mild soap. Absolutely avoid the washing machine and dryer as they could damage elastic fabrics and coatings. Let it dry completely in the open air, away from direct sunlight.
❓ Should I have a different vest for each race distance?
It’s not a requirement, but it’s highly recommended if you run very varied distances. An 8-10L vest is very versatile, but it will be too large for a 20 km trail and potentially too small for a 170 km ultra. Having at least two vests (a small one of 3-5L and a larger one of 10-12L) allows you to adapt to 95% of situations optimally.
❓ How do I know if my vest is well-adjusted? What’s the right tension?
A well-adjusted vest should feel like part of you, without compressing your rib cage. Once loaded, you should be able to breathe deeply without feeling restricted. Tighten the side straps so that there's no play, then adjust the chest straps. A good tip is to be able to fit two fingers (but no more) between a strap and your shoulder. The vest absolutely must not bounce while you run.